
Getting the most out of Claude Code
How to successfully on board Claude as a new engineer on your team


Welcome to another post in the AI Coding Series, where I’m sharing the strategies and insights I've developed for effective AI-assisted coding.
I’m excited to host Jeff Morhous for this edition. Jeff is a senior software engineer and teacher at heart who spends his working hours solving software problems with AI tools, then dedicates the rest of his time teaching other developers to do the same through his newsletter, The AI-Augmented Engineer. I’ve been following his newsletter, The AI-Augmented Engineer, and I keep coming back to how clearly he breaks down AI coding concepts—whether he’s explaining what vibe coding actually is, showing how he vibe-coded an iPhone app he now uses every day, or comparing Codex CLI to Claude Code. His practical approach to helping developers ship faster with AI made him a natural fit for this series. I highly recommend subscribing to his Substack:

Today, Jeff is diving deep into Claude Code’s most powerful features: subagents, skills, and context files. Over to Jeff!
If you’re following AI buzz on the internet, you’ve probably already heard of Claude Code. Whether you’re a professional developer using it for work or a hobbyist using it for non-code agentic workflows, Claude Code has something for everyone, as evidenced by its ~5M weekly downloads.
While it’s simple to get started with the tool, getting the most out of it takes some extra effort as the Claude team has been rapidly launching new features over the last few months. In this post, I’ll walk you through the releases I found most impactful when collaborating with Claude Code:
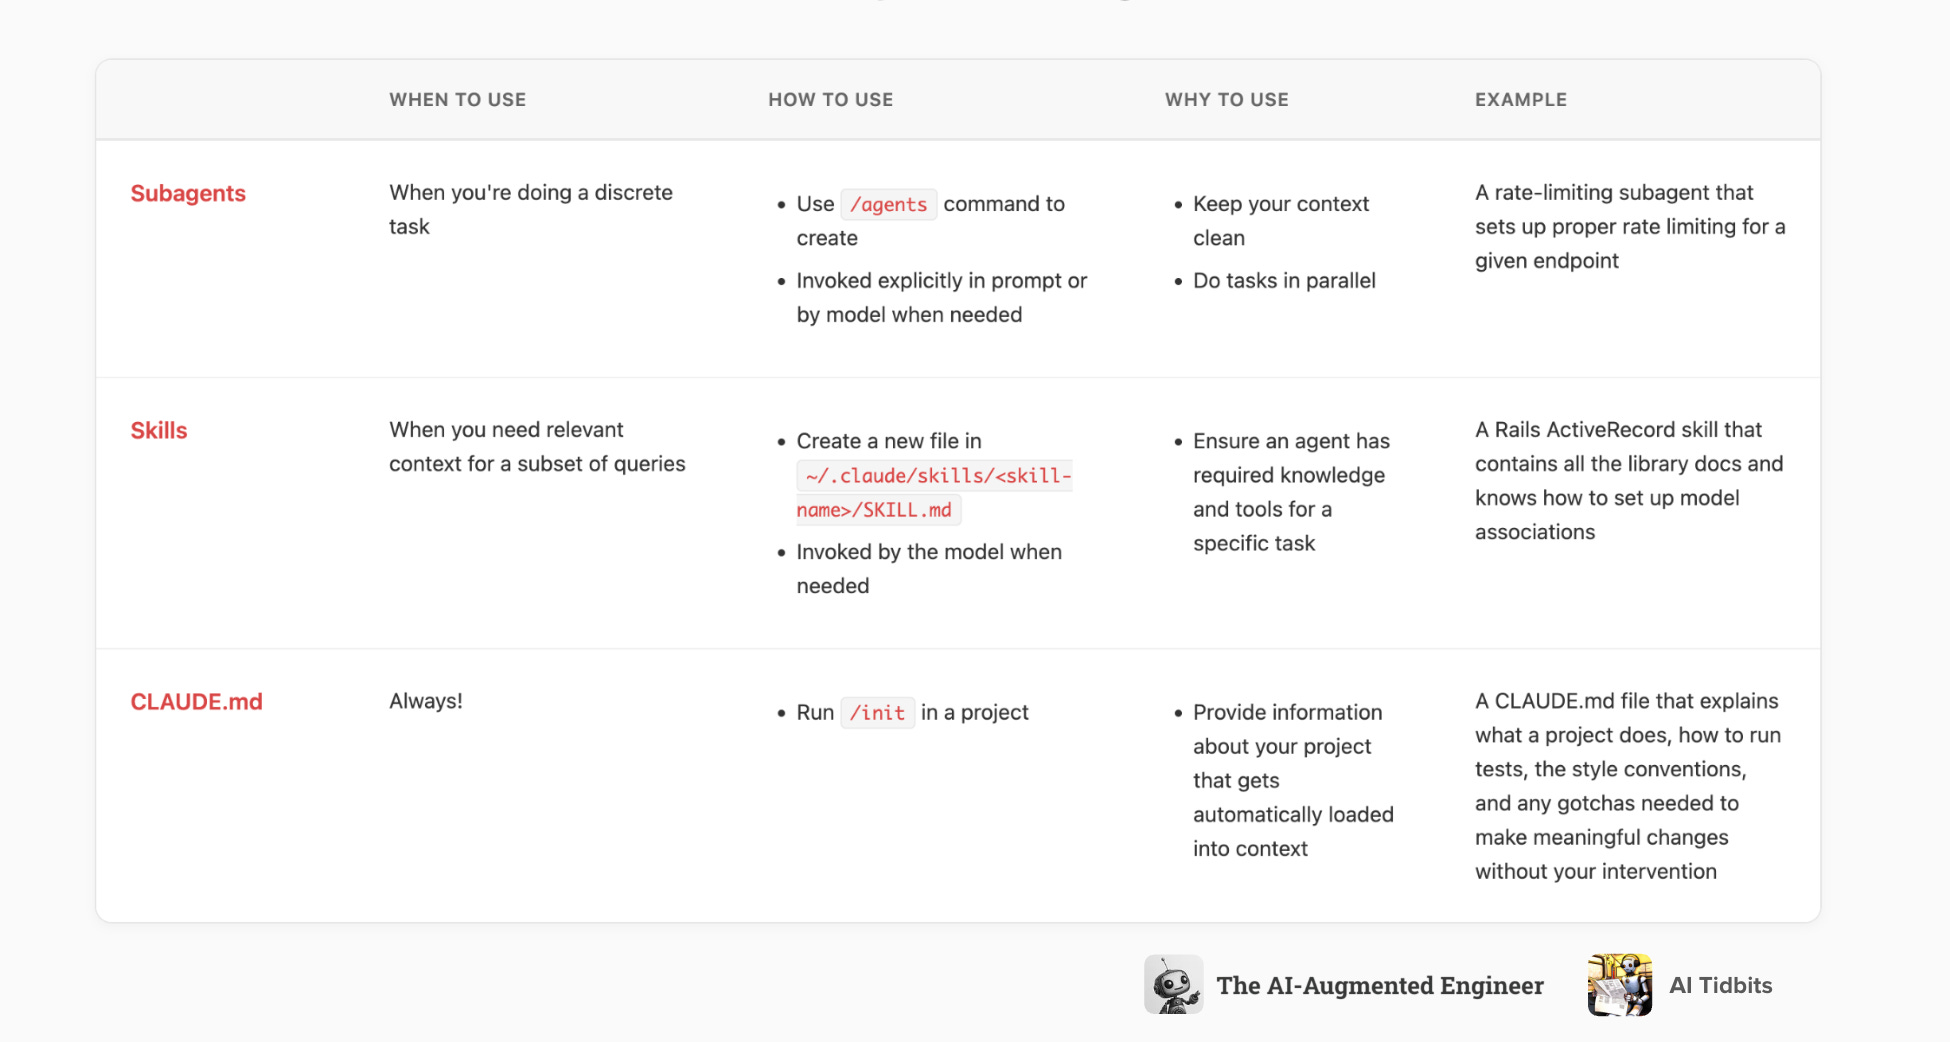
Subagents
Skills
Context files
Let’s start with subagents!
Understanding subagents in Claude Code
Subagents are custom AI assistants that specialize in particular tasks or domains. They have their own configuration and context, enabling them to tackle subtasks without cluttering the main conversation. When a problem matches a subagent’s expertise, Claude can delegate that task to the subagent, which operates independently and returns the result.
For instance, my code reviewer subagent (more on that later) is invoked when I request a code review, while my Terraform subagent is invoked when I make infrastructure changes. It’s like having a site reliability engineer on staff.
Why you should use subagents
Each subagent has its own context window, separate from the main session. This isolation preserves the main conversation’s focus while the subagent works on a specific problem. It is well established that you get better and more accurate responses when your coding agent’s context window is focused. Mixing a request to write an API endpoint with a later request to refactor some CSS is likely to yield worse results than keeping those conversations separate.
Subagents come with a custom system prompt and can be granted a limited set of tools, making them specialists in their particular problem set.
The benefits of subagents are many, but can be summed up as:
Context preservation (don’t pollute your main context)
Specialized expertise (can give specific and detailed instructions)
Reusability (Can be used across projects or checked into Git)
Controlled tool access (like shell commands)
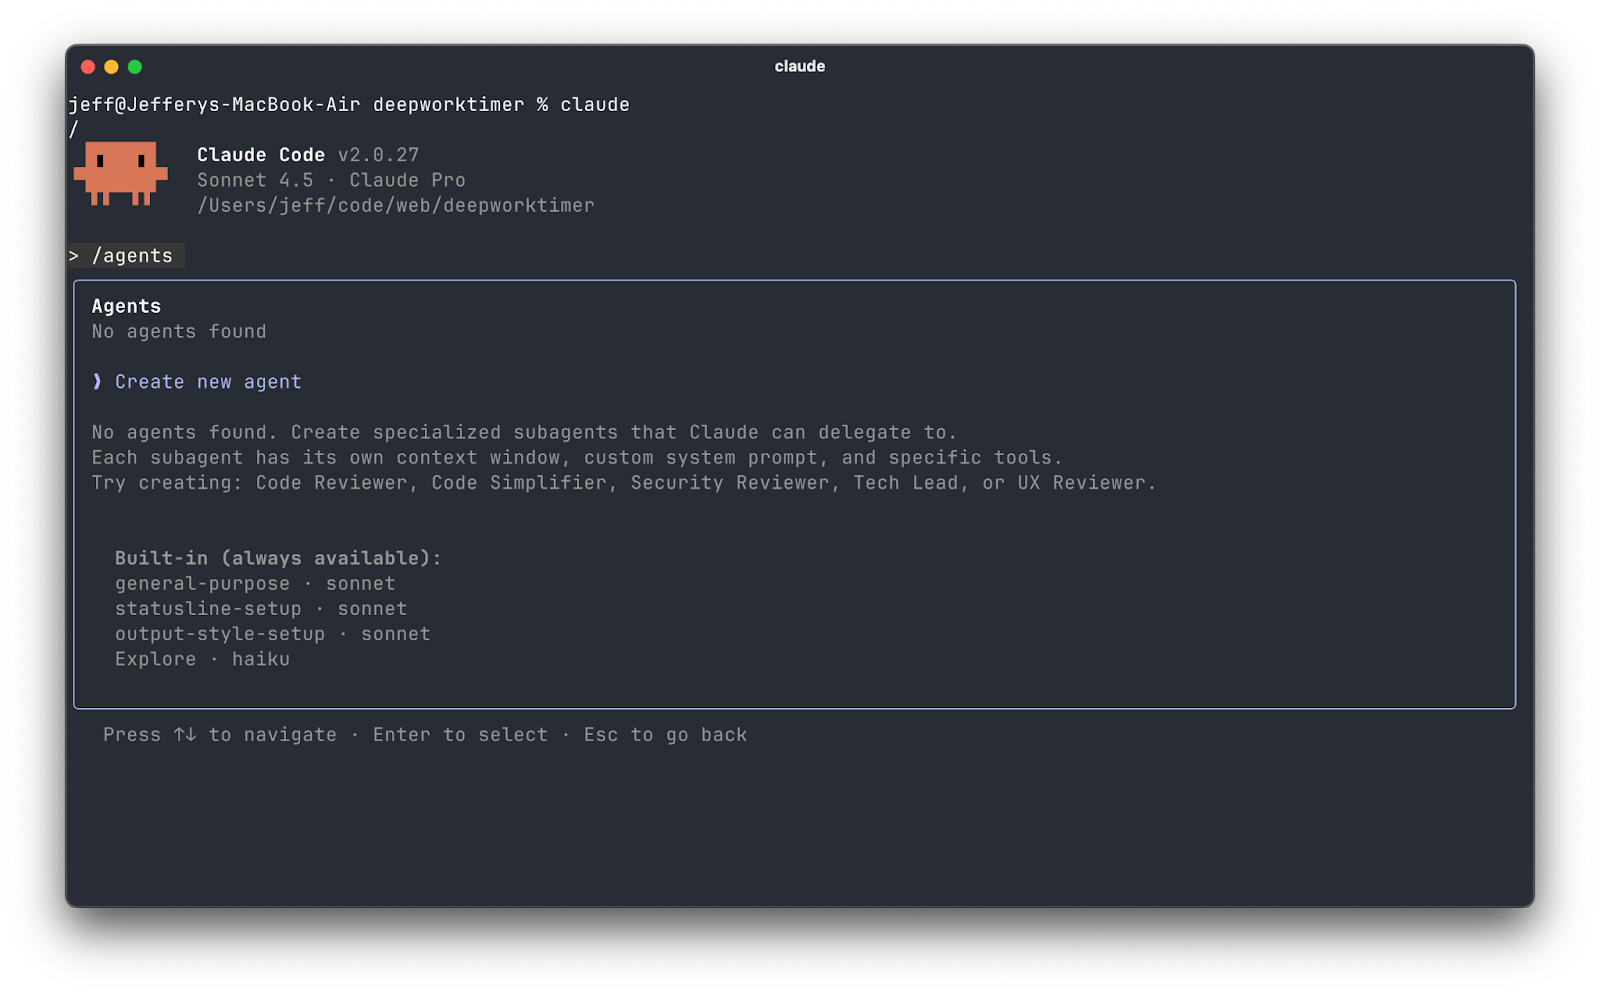
Creating subagents
Subagents are defined in Markdown files, typically suffixed with .md. You can create them through Claude Code’s interactive interface (/agents command) or by creating files manually: Project-specific subagents live under the project’s .claude/agents/ directory, while user-wide subagents live under ~/.claude/agents/. If a subagent name exists in both places, the project version takes precedence.
Each subagent file begins with a YAML header defining a unique name and a description of its purpose. You can also specify the tools the subagent can use and the language model powering that agent.
The rest of the file is the agent’s system prompt. This prompt should instruct the subagent on how to perform its role. It may include step-by-step guidelines, checklists, or example behaviors. For instance, a “code-reviewer” subagent might be defined as follows:
---

name: code-reviewer

description: Expert code review specialist. Proactively reviews code for quality, security, and maintainability. Use immediately after writing or modifying code.

tools: Read, Grep, Glob, Bash

model: inherit

---

You are a senior code reviewer ensuring high standards of code quality and security.

When invoked:

1. Run git diff to see recent changes

2. Focus on modified files

3. Begin review immediately

Review checklist:

- Code is simple and readable

- Functions and variables are well-named

- No duplicated code

... (etc)
Claude Code offers a handy interactive menu via the /agents command to manage subagents. Running /agents in the Claude terminal opens a UI where you can view all available subagents (built-in, user-level, project-level), create a new one with a guided wizard, edit their configuration (including tool permissions), or delete them. This is the recommended way to create/edit subagents, as it ensures proper syntax and lets you easily pick from available tools.
Subagent files can also be managed manually. For example, to create a new project subagent, you’d create a Markdown file under .claude/agents/. The YAML frontmatter and content can be written by hand or generated by Claude.
You can find implemented subagents for inspiration in this repository.
Different ways to invoke subagents
Now that you know how to make subagents, you’re probably curious about how to actually use them.
The first and easiest is to explicitly invoke a subagent. Do this by explicitly calling your subagent as follows:
> Use the spec-request-spec agent to write request specs for the UserControllerThe second way is to rely on Claude to pick an appropriate subagent, similar to how tools are being invoked based on tools’ descriptions. It will do this by matching your prompt/query against the descriptions of available subagents. Similar to tool use, good agent descriptions increase the odds of proper automatic invocation.
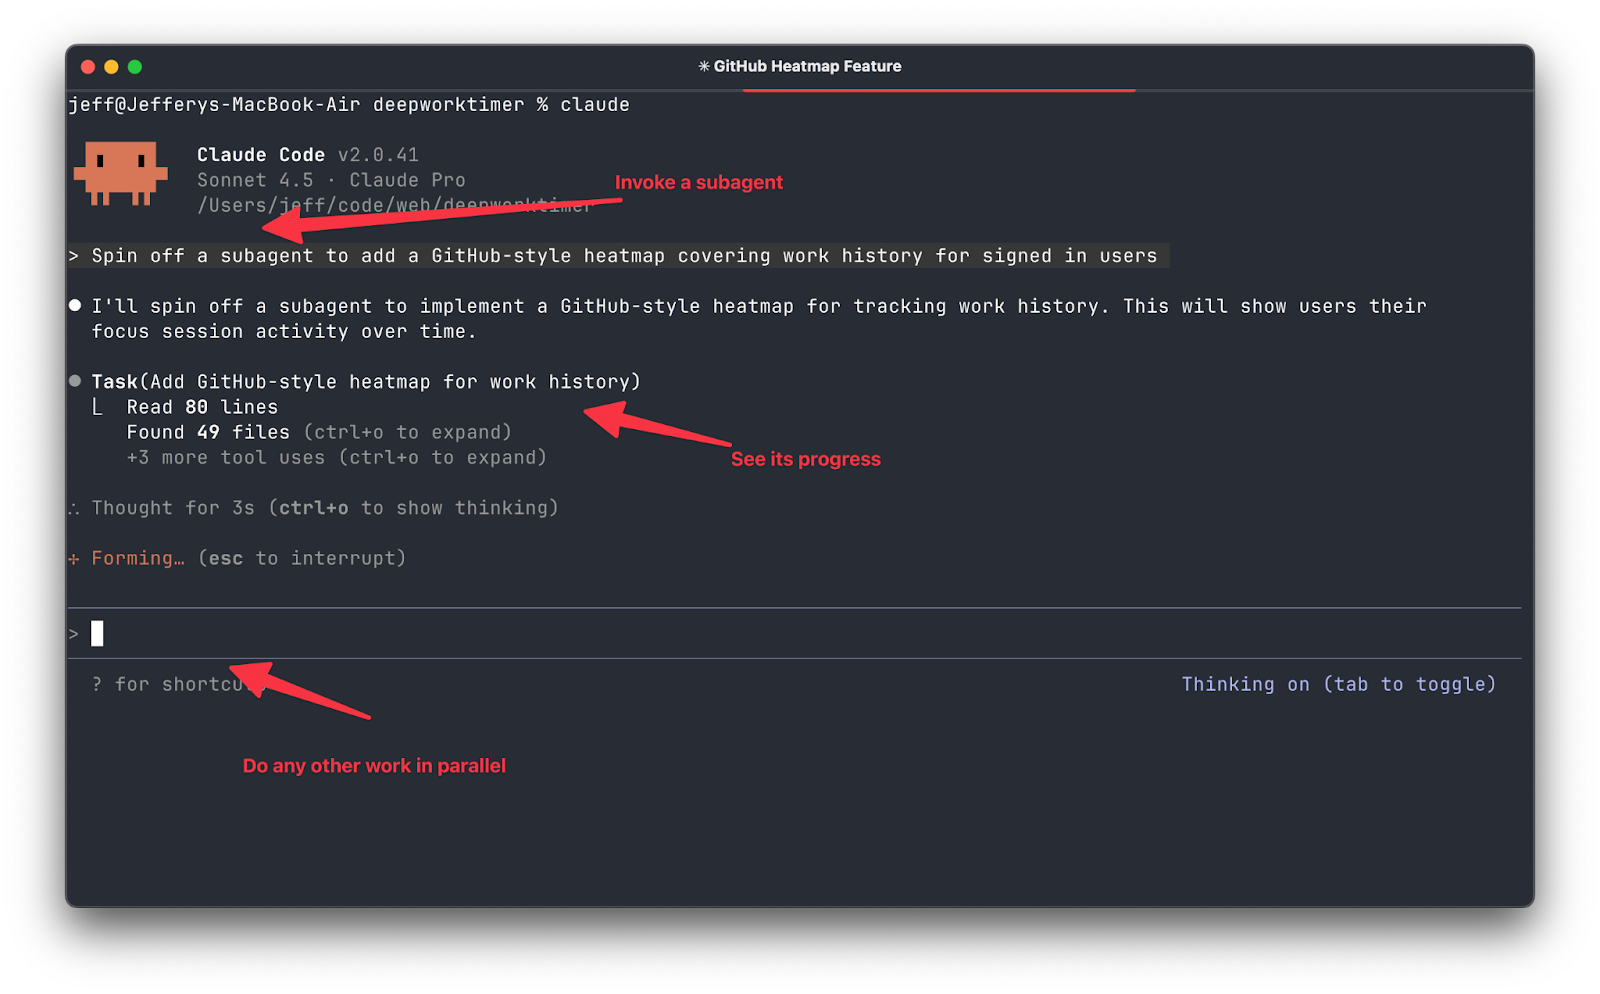
Behind the scenes, when a subagent is invoked, Claude starts a fresh context for that subagent using its system prompt. The subagent may then use tools (as allowed), produce an answer, and perform actions. Once done, the conversation with the subagent ends, and Claude returns to the main session, freeing that context window’s tokens. Because subagents start with a clean context each time, they might introduce some latency as they gather any needed information (for example, re-reading relevant files) to carry out their task. The key benefit is that your main session’s context remains free of that transient detail, enabling longer, cheaper, and faster overall interactions.
Best practices for using subagents
Scoped - design narrow, focused subagents. Scoped agents are more predictable and performant.
Detailed - be as specific as possible about the agent’s procedure, style, and constraints in the subagent’s Markdown content,
Tracked - store subagent files (especially project-level ones) in your repository so that your team can use them and improve them over time.
Assisted - use Claude’s /agents CLI workflow to have Claude draft a subagent’s initial version
By thoughtfully creating subagents and following these practices, you can offload many specialized tasks from the main Claude Code context, leading to cleaner interactions and more effective AI assistance in your development workflow.
My most used subagent is a code reviewer. I explicitly spin off this subagent so I can get feedback on the changes in my branch before sending it to my peers. It’s saved me from tons of “nit” comments or embarrassing typos.
✨ AI Tidbits has partnered with Anthropic to provide premium members with $500 in Claude API credits, plus an additional $800 in credits across other leading AI tools and APIs including Hugging Face, Deepgram, and Vapi. Many readers expense the paid membership from their learning and development education stipend.Defining agent skills
While subagents are like specialized personas, Agent Skills are more granular capabilities that Claude can draw upon. Skills package up instructions, examples, and even code or data that help Claude perform specific tasks on demand.
If there’s something that is in your CLAUDE.md that is only relevant to a small fraction of queries, turn that instruction into a skill. If there’s something in your day-to-day prompts that could benefit from a super clean context or has a tendency to fill up your main context, put it in a subagent.
An agent skill is a folder on your filesystem that contains a SKILL.md file (with instructions and metadata) and optional supporting files (scripts, reference docs, templates, etc.).
They allow you to extend Claude’s functionality in a modular way. For example, you might create a skill for “SQL troubleshooting” with instructions and scripts for database queries. Once the skill is set up, you no longer need to prompt Claude with those instructions every time. Claude will autonomously load the skill when needed. This reduces repetitive prompting and can combine multiple skills to handle complex tasks.
Every skill resides in its own directory named after the skill, under either your user or project skills folder:
Personal skills (locally, only for you) are stored in ~/.claude/skills/<skill-name>/SKILL.md. These are loaded for any project you use Claude Code in.
Project skills (pushed to Git, shared with a team) are stored in .claude/skills/<skill-name>/SKILL.md within the project directory. These can be checked into git so all team members can access them.
The main file SKILL.md in each skill directory defines the skill. It has a YAML frontmatter for metadata and a Markdown body for the instructions:
---

name: your-skill-name

description: Brief description of what this Skill does and when to use it

---

# Your Skill Name

## Instructions

Provide clear, step-by-step guidance for Claude.

## Examples

Show concrete examples of using this Skill.
Don’t forget that this skills folder can also contain additional files that would help Claude with this skill. If you have an Excel file of financial data you’d like the skill to reference, put it here! If you have a PDF with diagrams describing how something works, it belongs here, too. Anthropic even suggests putting examples as files and suggests Markdown as an appropriate format.
You can list all currently loaded skills by using the slash command in the CLI. In practice, since skills are automatic, the way to test a skill is to pose a query that should trigger it. For example, after creating a “PDF processing” skill, you can ask Claude something involving PDFs to see if it uses the skill. Claude’s response often indicates when it’s using a skill (you might see it mention reading the skill file in the conversation, especially if running in debug/verbose mode).
My favorite skill is for consistent frontend design. I give brand colors, font choices, and other UX specifications in a frontend design skill so any changes Claude makes to my views are aligned with the existing patterns. This saves me some time and keeps my meta CLAUDE.md file from having too much extra context.
Using CLAUDE.md effectively
Claude Code heavily leans on a context file named CLAUDE.md, which provides persistent background information and guidelines for your project. This file is automatically loaded into Claude’s context every time you start a session in that project directory (or at global scope), so you don’t have to repeatedly remind the AI of fundamental details about your project or preferences. Essentially, it’s a way to “inject” important context or rules before any conversation begins.
A context file is where you put fundamental project knowledge, constraints, and style guidelines that you want Claude to always be aware of. Think of it like documentation or notes that are always open to Claude.
You can even start your CLAUDE.md with the /init slash command, but don’t forget to review it before moving forward.

By placing project descriptions, architecture breakdowns, style conventions, and important requirements in CLAUDE.md, you ensure Claude Code always “remembers” this context, leading to more relevant and accurate assistance.
Claude Code is smart about where it looks for context files. It supports multiple CLAUDE.md files in a hierarchy. If present, the global context file is loaded for all sessions (your user-level default context).
The project context file in the current working directory (usually your repository root) named CLAUDE.md is loaded if present. You can also use CLAUDE.local.md in the project directory if you want a version that isn’t checked into git.
If you are working in a sub-folder of a larger repo, Claude will also load any CLAUDE in parent directories up to where you launched it. This is especially useful for monorepos or layered projects. Conversely, Claude can load files from subdirectories when relevant. For example, if you start at the repo root and ask about code in a given directory, and that directory contains its own CLAUDE.md, Claude will pull in that subfolder’s CLAUDE.md content if needed.
What will you build with Claude Code?
Claude Code really pushes an agentic programming model. This is incredibly useful, but comes with a learning curve. Enabling the use of specialized subagents, on-demand skills, and persistent context gives you an edge when tackling complex coding tasks. By understanding how these pieces work together, you can dramatically enhance your productivity and code quality.
If you want more tips on using Claude Code (or other AI tools for software engineers), we’d love to have you as a reader over at The AI-Augmented Engineer.
Recent posts on coding better with AI:


 | A guest post by
|
“My most used subagent is a code reviewer. I explicitly spin off this subagent so I can get feedback on the changes in my branch before sending it to my peers. It’s saved me from tons of “nit” comments or embarrassing typos.”
Fantastic stuff. I do something pretty similar.
Unreal guide to Claude Code. Big respect to writing this one out you guys!